


I recently had to dive very deeply into doing device administration AAA with Cisco Wireless LAN controllers and the SourceFire/Cisco FirePower Manager software. Given the interest that others have shown, I decided to write this Blog entry to share my experience.
How Device Admin AAA works on the Cisco WLC
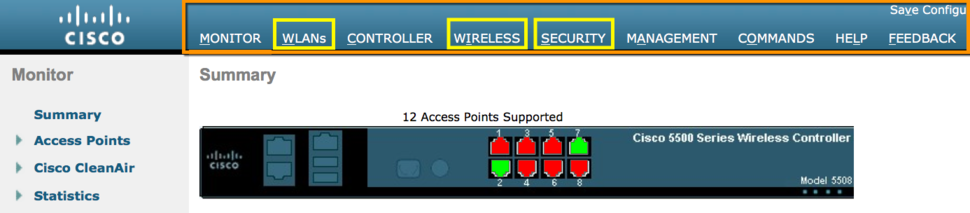
设备管理与Cisco Catalyst开关is capable of command-level authorizations. With the WLC, however, it is based on the sections of the menu system. It does not prevent access to those sections of the GUI, but instead prevents changes from being saved when inside a menu section that is not authorized.
图1显示了不同的菜单橙色box, with three of the individual menus highlighted with a yellow box.
 Aaron Woland
Figure 1 - WLC Menus
The authorization results from the TACACS+ Server will need to list out the menus that the user is authorized to make changes within. Each of these menu sections should be called out with the text "role." For example, to allow a user to make changes only within the WLANs, Wireless and Security menus, the TACACS+ authorization result should include the following text: role1=WLANS role2=SECURITY role3=WIRELESS. Order does not matter.
Here is the list of roles that exist for the Cisco WLC:
- WLAN
- CONTROLLER
- WIRELESS
- SECURITY
- MANAGEMENT
- COMMANDS
There are some special roles that cannot be mixed with any other roles:
- LOBBY- Permits access to the Lobby Ambassador functions.
- ALL- Just like it sounds. All Menus.
Adding ISE to the WLC TACACS+ Servers
ISE will need to be added to the WLC as a TACACS+ Authentication Server, Authorization Server, and an Accounting server. The TACACS+ servers are listed underSecurity > AAA > TACACS+.
Navigate toSecurity > AAA > TACACS+ > Authenticationand clickNew.
Fill in the Server IP Address and the Shared Secret as seen in Figure 2, and clickApply.
 Aaron Woland
Figure 2 - WLC TACACS+ Authentication Server
Navigate toSecurity > AAA > TACACS+ > Accountingand clickNew.
Fill in the Server IP Address and the Shared Secret as seen in Figure 3, and clickApply.
 Aaron Woland
Figure 3 - WLC TACACS+ Accounting server
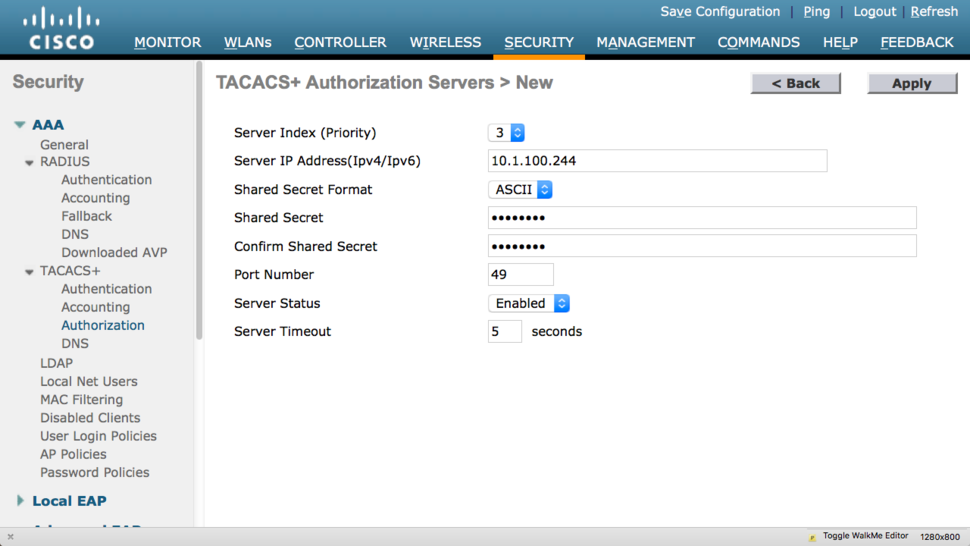
Navigate toSecurity > AAA > TACACS+ > Authorizationand clickNew.
Fill in the Server IP Address and the Shared Secret as seen in Figure 4, and clickApply.
 Aaron Woland
Figure 4 - WLC TACACS+ Authorization Server
Now the ISE Node has been added to the WLC for use with TACACS+, but the WLC is not authenticating users for login yet. You will do that later. At this point, you need to add the WLC as a TACACS+ NAD on ISE.
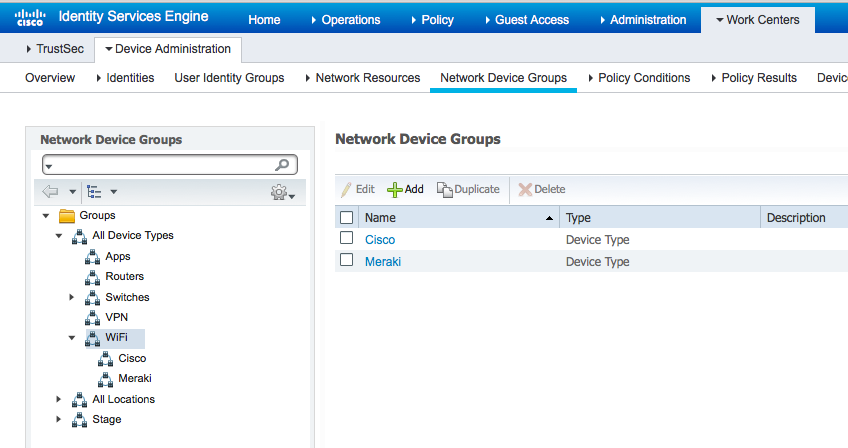
Within the ISE GUI, Navigate toWork Centers > Device Administration > Network Device Groups. If you've been following my guidance all these years, then you will already have a detailed set of hierarchical Network Device Groups (NDGs), such as those displayed in Figure 5.
 Aaron Woland
Figure 5 - Network Device Groups
The point is - let's ensure that these Cisco WLCs have their own group for a device type. With that group, we can ensure that a device administration policy set is built just for these devices and their unique way of doing Device Administration.
Next, you should ensure your Cisco WLC itself is added to ISE and has the TACACS+ shared secret configured.
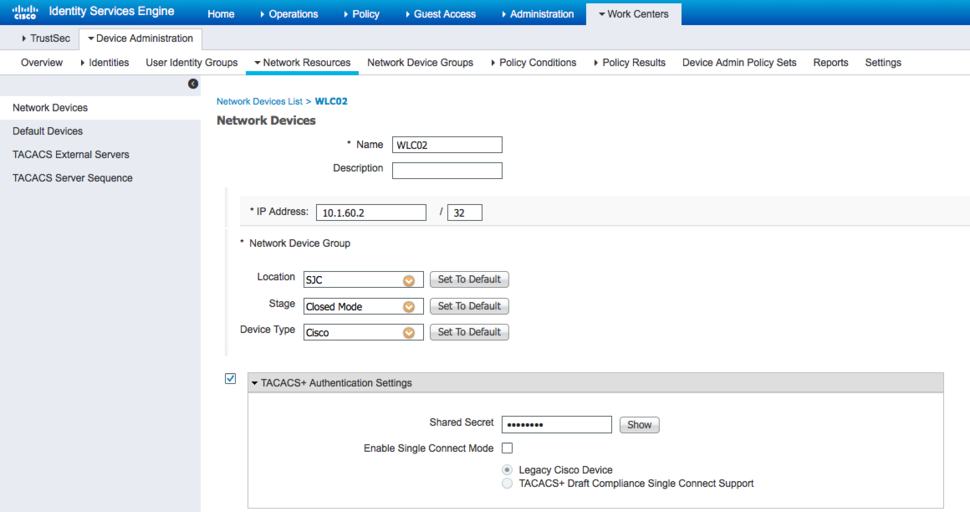
Navigate toWork Centers > Device Administration > Network Resources > Network Devices. Click on the WLC or Click Add to create a new one.
Ensure the Network Device Groups are assigned properly and the TACACS+ Shared Secret is configured correctly. Figure 6 shows the NAD settings.
 Aaron Woland
Figure 6 - Network Device Settings
If you haven't already, ensure that device administration is enabled on the ISE policy services node underAdministration > System > Deployment, select your ISE PSN, as seen in Figure 7. Enable the device admin service (it is off by default).
 Aaron Woland
Figure 7 - Deployment Screen
Prepare the Authorization Results
Device Administration AAA is ready on ISE, but you have no policies and no Authorizations to send down to the WLC yet. Now you're going to add one TACACS Profile for each role that you plan to use with the WLC.
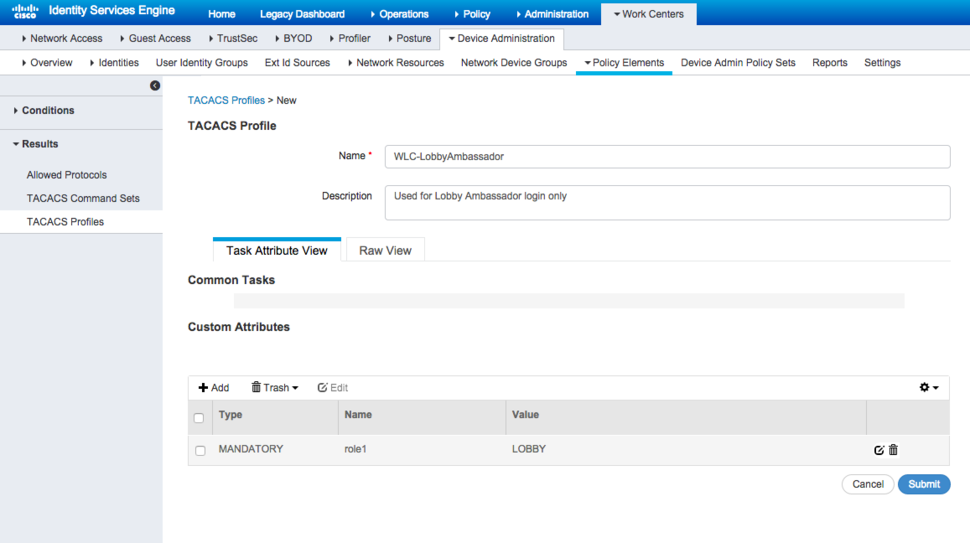
Navigate toWork Centers > Device Administration > Policy Results > TACACS Profiles. ClickAdd. Name the profile and add good description. I find it is always best to name the profile based on the device that will use it. Such as WLC-LobbyAmbassador.
Under Custom Attributes, clickAdd.Create a MANDATORY attribute, name it "role1", and the Value should be set to whichever role you are configuring, as seen in Figure 8, which has role1 set to LOBBY. ClickSave.
 Aaron Woland
Figure 8 - Lobby Ambassador Role
At any time, you can edit the Raw View, which is just text, as seen in Figure 9.
 Aaron Woland
Figure 9 - Lobby Ambassador Raw Attributes
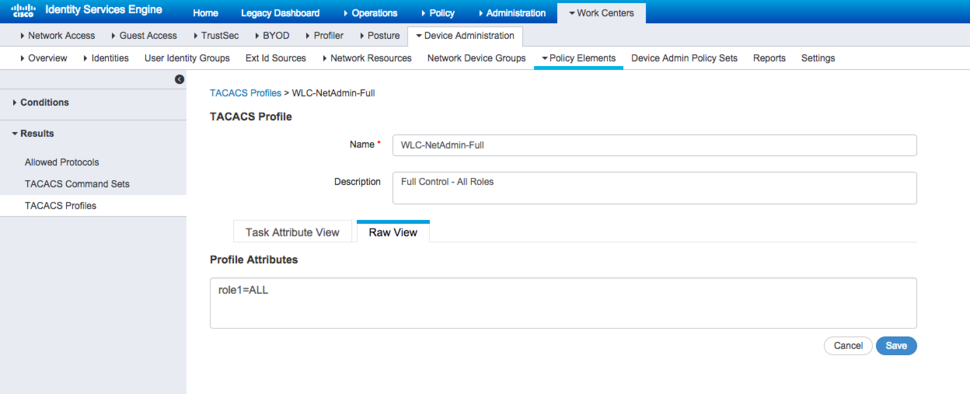
Add another TACACS Profile for each of the role types for your organization. For example: create a new TACACS Profile named WLC-NetAdmin-Full, that sends role1=ALL.
 Aaron Woland
Figure 10 - Net Admin Full Control
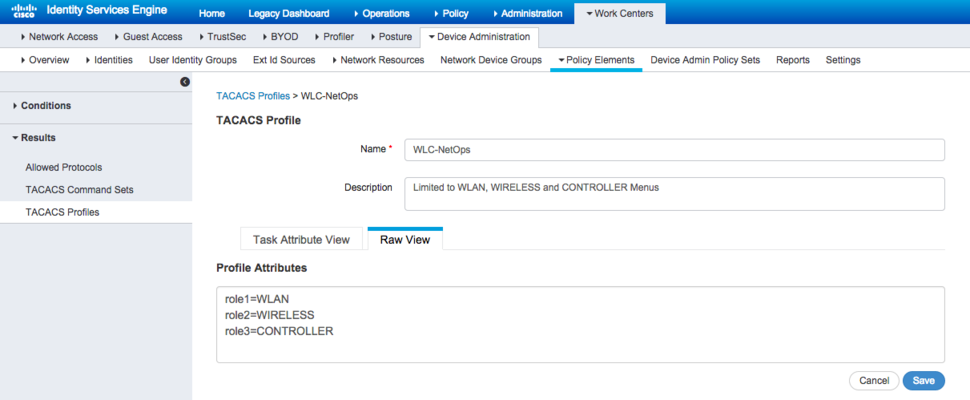
I created another example named "WLC-NetOps", and assigned three roles: WLAN, WIRELESS and CONTROLLER, as shown in Figure 11. Notice how each role number must increment (role1, role2, role3).
 Aaron Woland
Figure 11 - WLC-NetOps
I chose to also create another result named "WLC-HelpDesk" that has "Role1=MONITOR" to use for helpdesk access.
Once you have all the role types that you need, it's time to create the Device Administration Policy Set for the WLC's. Navigate toWork Centers > Device Administration > Device Admin Policy Sets.
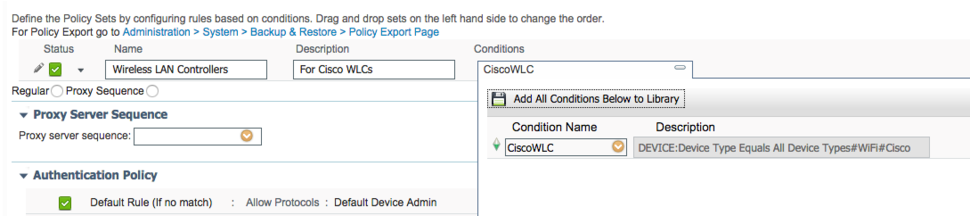
Create a new Policy Set above the default. Name the set "Wireless LAN Controllers", and provide a description. The Conditions for the Policy Set should leverage the Network Device Group (NDG) for Cisco Wireless Controllers, like what is shown in Figure 12.
 Aaron Woland
12 - WLC Dev Admin Set
Now we'll go ahead with building authorization rules. One rule each, for: Helpdesk, NetOps, NetAdmin, and Lobby.
Figure 13 shows the screen shot of the Device Admin Policy Set for Cisco Wireless Controllers that was created for these policy results and this blog post.
 Aaron Woland
Figure 13 - WLC Authorization Policy
Configure the WLC to use the TACACS+ Server
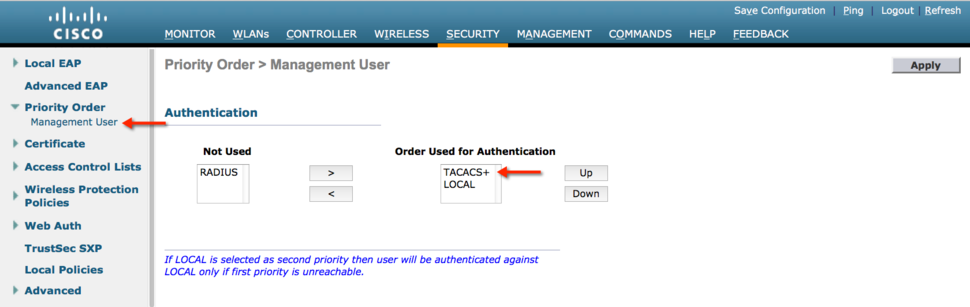
Now that the AuthZ policy has been built and the T+ servers are defined in the WLC, the next step is to configure the WLC to use the T+ server for administrative access. This is done underSecurity > Priority Order > Management User. Ensure TACACS+ is at the top of the list titled "Order Used for Authentication" and then ClickApply. Figure 14 shows the WLC setting.
 Aaron Woland
Figure 14 - Management Login Order
That's it.. You are setup now.
A very Interesting Troubleshooting Capability
As I was going through this, I decided to watch the controller console through a调试aaa tacacs启用session. What I noticed was that an assigned role 'number' was given at the end. This made me curious and so I looked into it. Example 1 shows a debug output.
Example 1 -Debug aaa tacacs enableoutput
*tplusTransportThread: Dec 14 17:40:43.409: Conecting to tacacs server 10.1.100.244 on port=49
*tplusTransportThread: Dec 14 17:40:43.417: Received tplus auth response: type=1 seq_no=2 session_id=10c15fcb length=15 encrypted=0
*tplusTransportThread: Dec 14 17:40:43.417: TPLUS_AUTHEN_STATUS_GETPASS
*tplusTransportThread: Dec 14 17:40:43.417: auth_cont get_pass reply: pkt_length=25
*tplusTransportThread: Dec 14 17:40:43.417: processTplusAuthResponse: Continue auth transaction*tplusTransportThread: Dec 14 17:40:43.752: Received tplus auth response: type=1 seq_no=4 session_id=10c15fcb length=6 encrypted=0
*tplusTransportThread: Dec 14 17:40:43.752: Created tacacs author request payload(rc=0)
*tplusTransportThread: Dec 14 17:40:43.752: TPLUS_AUTHEN_STATUS_PASS: username=[NetOps1]
*tplusTransportThread: Dec 14 17:40:43.752: Conecting to tacacs server 10.1.100.244 on port=49
*tplusTransportThread: Dec 14 17:40:43.827: author response body: status=1 arg_cnt=3 msg_len=0 data_len=0
*tplusTransportThread: Dec 14 17:40:43.827: arg[0] = [10][role1=WLAN]
*tplusTransportThread: Dec 14 17:40:43.827: arg[1] = [14][role2=WIRELESS]
*tplusTransportThread: Dec 14 17:40:43.827: arg[2] = [16][role3=CONTROLLER]
*tplusTransportThread: Dec 14 17:40:43.827:User has the following mgmtRole 38
So I wondered to myself, what does mgmtRole 38 signify, and how does it calculate that role number.
Each role type, i.e.: menu item has an assigned hex value, which is added together to achieve the final mgmtRole value. The list below shows the roles and their individual values:
- LOBBY = 2
- WLAN = 8
- CONTROLLER = 10
- WIRELESS = 20
- SECURITY = 40
- MANAGEMENT = 80
- COMMANDS = 100
Comparing the role and value list above to the debug output in Example 1, we see that Role1=WLAN (value is 8) + Role2=WIRELESS (value is 20) + Role3=CONTROLLER (Value is 10). That translates to 8 + 20 + 10 = 38. The debug shows that mgmtRole is 38.